3D Interior Design Rendering A Comprehensive Guide
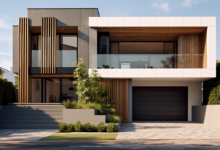
3D Interior Design Rendering has revolutionized the way we visualize and experience interior spaces. This powerful technique allows designers and clients to explore design concepts in a highly realistic and immersive manner, before a single nail is hammered or paintbrush is lifted. From initial sketches to the final product, 3D rendering bridges the gap between imagination and reality, facilitating collaboration and informed decision-making throughout the entire design process.
This guide will explore the process, applications, and creative techniques behind this transformative technology.


The journey into 3D interior design rendering begins with a thorough understanding of the software and hardware involved. Popular programs like SketchUp, Revit, Blender, and 3ds Max are frequently used, paired with powerful computers to handle the demanding processing requirements. Different styles, from photorealistic to stylized, offer diverse aesthetic options, each contributing to the unique expression of a design vision.
The ability to seamlessly blend 2D and 3D representations provides a comprehensive design workflow, offering clients multiple perspectives to fully appreciate the proposed space.
Defining 3D Interior Design Rendering
D interior design rendering is the process of creating photorealistic or stylized digital images of interior spaces. It’s a powerful tool used by architects, interior designers, and real estate professionals to visualize and present design concepts to clients before any physical construction begins. These renderings offer a compelling and immersive preview of a space, allowing for easier client feedback and informed decision-making.The process of creating a 3D interior design rendering involves several key steps.
First, a 3D model of the space is built using specialized software. This model incorporates all the elements of the design, including walls, floors, ceilings, furniture, lighting, and decorative objects. Next, materials are assigned to the model’s surfaces, giving them realistic textures and appearances. Then, lighting is meticulously planned and implemented to accurately simulate natural and artificial light sources.
Finally, the scene is rendered, which is a computationally intensive process that generates the final image. Post-processing may then be applied to enhance the image’s realism or artistic style.
Software and Hardware Used in 3D Interior Design Rendering
Creating high-quality 3D renderings requires both powerful software and hardware. Popular software applications include Autodesk 3ds Max, SketchUp, Blender (a free and open-source option), Lumion, and V-Ray. These programs offer a range of tools for modeling, texturing, lighting, and rendering. On the hardware side, a high-performance computer with a powerful graphics processing unit (GPU) is essential. The GPU accelerates the rendering process significantly, reducing the time required to generate images.
A large amount of RAM is also beneficial for handling the large datasets involved in complex 3D models. For example, a high-end workstation with a NVIDIA RTX series GPU, 32GB or more of RAM, and a fast processor would be ideal for efficient rendering.
Styles and Techniques Employed in 3D Interior Design Rendering
D interior design renderings can be created in a variety of styles, ranging from photorealistic to artistic interpretations. Photorealistic renderings aim to create images that are indistinguishable from photographs, emphasizing detail and accuracy. Stylized renderings, on the other hand, may employ artistic techniques such as painterly effects, exaggerated colors, or simplified geometries to convey a particular mood or aesthetic.
Different rendering techniques, such as ray tracing and path tracing, are used to simulate light interaction with surfaces, resulting in variations in realism and visual quality. For instance, ray tracing can produce sharp, realistic reflections and shadows, while path tracing can create more subtle and diffuse lighting effects.
3D interior design rendering provides a powerful visualization tool, allowing clients to experience their space before any physical changes are made. This process is often enhanced by a preliminary Interior Design Consultation , which helps to refine design choices and ensure the final rendering accurately reflects the client’s vision. Ultimately, the 3D rendering becomes a collaborative outcome, perfectly representing the finalized design plan.
Comparison of 3D Rendering and 2D Design Representations
D rendering offers significant advantages over traditional 2D design representations, such as floor plans and elevations. While 2D drawings provide accurate measurements and spatial relationships, they lack the visual impact and immersive quality of 3D renderings. 3D renderings allow clients to experience the space virtually, helping them better understand the design’s impact on the overall feel and ambiance.
2D drawings are essential for technical accuracy and construction documentation, but 3D renderings excel in communicating the design’s aesthetic appeal and spatial experience. A 2D floor plan shows the layout, but a 3D rendering shows how the space will feel – the light, the materials, the furniture arrangement all come together in a much more engaging way.
Applications of 3D Interior Design Rendering
- D interior design rendering has revolutionized the way we visualize and communicate spatial design. Its applications span across various sectors, from residential projects to large-scale commercial ventures, significantly impacting design processes and client engagement. The ability to create photorealistic representations allows for detailed exploration and refinement of design concepts before physical construction, leading to more efficient and cost-effective projects.
- D rendering provides a powerful tool for visualizing and communicating design ideas across various scales and applications. Its use significantly enhances the design process and client experience, improving collaboration and decision-making.
Residential Project Applications
In residential projects, 3D rendering offers homeowners a clear and compelling vision of their future living spaces. Imagine a couple planning a kitchen renovation. Instead of relying solely on 2D blueprints, they can experience a fully rendered, three-dimensional model showcasing the new layout, cabinetry, countertops, and appliances. This allows them to make informed decisions about materials, colors, and overall design aesthetics before committing to any expensive changes.
For instance, a client might initially envision a dark wood cabinet but, upon seeing a realistic rendering, decide on a lighter shade to maximize natural light in their space. The ability to virtually “walk through” the space and experience the scale and proportions is invaluable in ensuring client satisfaction. Furthermore, visualizing different lighting schemes and furniture arrangements within the rendering allows for iterative adjustments, ultimately resulting in a design that perfectly meets the client’s needs and preferences.
Commercial Interior Design Case Studies
The application of 3D rendering extends significantly to commercial spaces. Consider the design of a new restaurant. Architects and designers can use 3D rendering to showcase the ambiance, layout, and branding elements to potential investors. A compelling rendering could depict the restaurant’s proposed atmosphere, highlighting the lighting, furniture, and décor to attract investors and secure funding. Another example is a corporate office redesign.
Using 3D rendering, designers can present various workspace configurations to company executives, allowing them to assess the impact on workflow, employee interaction, and overall productivity before implementing significant changes. A case study of a hotel chain using 3D renderings to market new hotel designs to franchisees would demonstrate the impact of realistic visualizations on investment decisions and brand consistency.
The renderings would showcase the intended atmosphere and design elements across different room types and public spaces.
Communicating Design Ideas to Clients
D rendering serves as a crucial communication tool between designers and clients. Instead of relying solely on technical drawings or verbal descriptions, designers can present photorealistic images and virtual tours that instantly convey the design’s essence. This visual approach significantly bridges the communication gap between technical expertise and client understanding. The ability to make changes and iterations based on client feedback within the 3D model creates a collaborative and iterative design process.
For instance, if a client expresses concerns about the lighting in a specific area, the designer can easily adjust the lighting scheme within the rendering and present the revised version immediately, ensuring prompt feedback and a more satisfying outcome.
Virtual Staging and Real Estate Marketing
In real estate marketing, 3D rendering is transforming the way properties are presented. Virtual staging, which involves digitally furnishing and decorating empty spaces, allows potential buyers to envision the property’s full potential. This technique is particularly useful for vacant properties or those requiring significant renovations. A vacant apartment rendered with stylish furniture and decor is far more appealing to potential buyers than empty rooms.
Furthermore, 3D renderings can be incorporated into virtual tours, allowing prospective buyers to explore the property remotely and from any location. This expands the reach of real estate marketing, enabling international buyers to experience the property without physically visiting. The impact on sales can be significant, particularly in competitive markets. High-quality 3D renderings can help properties stand out and attract more buyers, ultimately increasing sales prices and reducing time on the market.
The Creative Process in 3D Interior Design Rendering

Source: co.uk
Transforming a client’s vision into a captivating 3D interior rendering is a multi-stage creative process that blends artistic flair with technical precision. It’s a journey from initial concept sketches to a photorealistic final product, requiring careful planning and execution at each step. The process necessitates a strong understanding of both design principles and 3D software capabilities.The creation of a 3D interior rendering involves a structured workflow, moving methodically through distinct phases to achieve a high-quality, realistic representation of the intended space.
This ensures a smooth process and a final product that accurately reflects the client’s brief and the designer’s artistic vision.
Workflow for Creating a 3D Interior Rendering
A typical workflow begins with concept development and progresses through modeling, texturing, lighting, and rendering. Each stage builds upon the previous one, contributing to the overall realism and aesthetic appeal of the final image. Careful planning and organization at each step are crucial for efficient production and a polished final result.
Modeling
This stage involves creating the three-dimensional forms of the space and its furnishings. Accurate measurements are paramount; even minor discrepancies can lead to significant errors in the final rendering. The process typically begins with a floor plan, which serves as the foundation for the 3D model. Walls, floors, ceilings, and other structural elements are built upon this foundation, followed by the addition of furniture, fixtures, and other details.
Precision in modeling ensures that the spatial relationships within the design are correctly represented. For instance, ensuring the correct dimensions of a sofa in relation to a coffee table is crucial for realistic depiction. Advanced modeling techniques may be employed to create intricate details such as crown molding or custom furniture.
3D interior design rendering allows potential hotel guests to virtually experience a room before booking. This is particularly useful when showcasing the amenities offered, such as those provided through efficient Hotel Room Service , which can be visually integrated into the renderings. Ultimately, high-quality 3D renderings significantly improve the marketing and booking process for hotels.
Texturing
Once the 3D model is complete, the next step is to apply textures to the surfaces. This involves selecting or creating materials that accurately reflect the look and feel of the real-world counterparts. Realistic materials and textures are essential for achieving a convincing final render. For example, a polished marble floor requires a different texture than a rough-hewn wooden table.
High-resolution textures contribute significantly to the overall quality and realism of the rendering. The choice of textures significantly impacts the mood and style of the design. A glossy finish on a kitchen cabinet will appear quite different from a matte finish, influencing the overall perception of the space.
Lighting
Lighting plays a crucial role in setting the mood and highlighting key features of the design. Accurate lighting is essential for creating a realistic atmosphere. Different lighting types, such as ambient, directional, and point lights, can be used to simulate natural and artificial light sources. Careful placement and adjustment of lights are crucial for creating shadows, highlights, and reflections that enhance the realism of the scene.
For example, a strategically placed spotlight can accentuate a piece of artwork, while soft, diffused lighting can create a warm and inviting atmosphere. The interplay of light and shadow is essential for creating depth and dimension in the rendering.
Rendering
The final stage involves generating the image from the completed 3D model. This process uses sophisticated software to simulate the interaction of light with surfaces, creating a photorealistic image. The rendering settings, such as resolution, anti-aliasing, and global illumination, significantly impact the final output’s quality. High-resolution renders are essential for print and online display, allowing for detailed examination of the design.
The rendering process can be computationally intensive, often requiring powerful hardware for efficient processing. The final rendered image is the culmination of all previous stages, representing the finished 3D interior design.
3D interior design rendering offers a powerful way to visualize spaces before construction. For instance, when designing a bathroom, seeing a realistic preview is invaluable. This is why exploring options like those offered at Bathroom Interior Design and then rendering them in 3D can significantly enhance the design process, leading to more informed and satisfying results.
Ultimately, 3D rendering elevates the entire design experience.
Advanced Techniques in 3D Interior Design Rendering
Source: floorplanforrealestate.com
Creating truly photorealistic and immersive 3D interior renderings requires mastering advanced techniques beyond the basics. This section delves into the sophisticated tools and methods that elevate renderings from good to exceptional, transforming digital spaces into believable and captivating environments. We’ll explore lighting, rendering engines, common issues, and character/prop creation.
Advanced Lighting Techniques
Global illumination (GI) and ray tracing are crucial for achieving realistic lighting effects. GI simulates the way light bounces and interacts within a scene, creating indirect lighting that significantly impacts the overall mood and realism. Ray tracing, on the other hand, meticulously tracks the path of light rays, producing highly accurate reflections, refractions, and shadows. The combination of these techniques generates a level of detail and visual fidelity unmatched by simpler lighting methods.
For instance, GI might realistically illuminate a room indirectly through a window, while ray tracing would accurately depict the reflection of a chandelier in a polished floor.
Rendering Engine Selection and its Implications
Different rendering engines offer unique strengths and weaknesses. V-Ray, for example, is known for its speed and versatility, while Arnold excels in its ability to handle complex scenes with high accuracy. OctaneRender utilizes GPU acceleration for faster rendering times, particularly beneficial for large projects. The choice of engine depends on project requirements, available hardware, and the desired level of realism.
A project with highly detailed materials might benefit from Arnold’s accuracy, while a project with tight deadlines might favor V-Ray’s speed. Each engine necessitates a different workflow and skill set, impacting project timelines and resource allocation.
Common Rendering Issues and Their Solutions
Several issues can arise during the rendering process. Noise in the final image, often appearing as graininess, is a common problem, often addressed by increasing render samples or using denoising software. Long render times can be mitigated by optimizing the scene geometry, reducing polygon counts, and employing efficient rendering settings. Artifacts such as flickering lights or incorrect shadows may require adjustments to lighting parameters or scene setup.
For instance, a flickering light might indicate a problem with the light source’s settings, while incorrect shadows might be due to incorrect placement of objects or lights within the scene.
Realistic Human Characters and Props, 3D Interior Design Rendering
Creating believable human characters and props requires careful attention to detail. High-resolution models with accurate textures and realistic animations are essential. Using physically based rendering (PBR) materials ensures that objects react to light in a physically plausible way, enhancing realism. For instance, a realistic leather sofa would exhibit subtle variations in texture and reflectivity, accurately responding to light sources in the scene.
The integration of realistic human characters adds a sense of scale and life to the scene, helping to convey the intended atmosphere and use of space. Advanced techniques such as subsurface scattering can simulate the way light penetrates and scatters within translucent materials, further enhancing realism in characters and objects.
Presenting 3D Interior Design Renderings

Source: archicgi.com
Presenting 3D interior design renderings effectively is crucial for securing clients and showcasing your design vision. A well-crafted presentation transforms technical renderings into compelling narratives, highlighting the project’s atmosphere, functionality, and aesthetic appeal. This involves careful consideration of image quality, presentation layout, and the overall narrative flow.
A successful presentation goes beyond simply displaying images; it’s about telling a story. Each rendering should contribute to a cohesive narrative, guiding the viewer through the space and highlighting key design elements. The selection and sequencing of images are as important as the images themselves.
Sample Presentation: A Modern Kitchen Renovation
This example showcases a modern kitchen renovation, demonstrating a variety of presentation techniques. We’ll utilize a table to organize the images and descriptions, highlighting key features and design choices.
| Image | Description | Key Features | Design Concept |
|---|---|---|---|
| Imagine a wide-angle shot showcasing the entire kitchen. Clean lines, minimalist cabinetry in a light grey, and a large island dominate the space. Natural light floods the area, reflecting off stainless steel appliances. The flooring is a light oak hardwood. | Overall Kitchen View | Open-plan layout, natural light, minimalist design, high-end appliances | Modern, functional, and bright |
| A close-up shot focuses on the island, highlighting the quartz countertop, integrated sink, and sleek bar stools. A subtle backsplash of white subway tiles adds a touch of classic elegance. | Island Detail | Quartz countertop, integrated sink, bar seating | Blending modern and classic elements |
| A detail shot showcasing custom cabinetry with integrated handle-less doors. The cabinetry seamlessly blends with the walls, enhancing the minimalist aesthetic. | Cabinetry Detail | Custom cabinetry, handle-less doors, integrated storage | Clean lines and seamless integration |
| A perspective shot from the dining area looking into the kitchen, emphasizing the flow between the spaces. The view includes a glimpse of a modern dining table and chairs. | Kitchen from Dining Area | Open concept, seamless transition between spaces | Creating a cohesive living space |
Best Practices for High-Quality Images
Creating compelling renderings requires attention to detail and the use of appropriate software and techniques. High-resolution images are essential for print and online applications. Proper lighting, material selection, and post-processing are crucial for achieving photorealistic results.
For online portfolios, images should be optimized for web use, balancing image quality with file size to ensure fast loading times. Consider using lossy compression techniques (like JPEG) for photographs and lossless techniques (like PNG) for graphics with sharp lines and text.
Image Resolution and File Formats
The choice of resolution and file format depends heavily on the intended application. High resolutions (e.g., 4000 x 3000 pixels or higher) are ideal for large-format prints and high-resolution displays. For web use, lower resolutions (e.g., 1920 x 1080 pixels) are generally sufficient, provided image quality remains acceptable.
3D interior design rendering offers a powerful way to visualize spaces before construction begins, allowing clients to explore various design options. For those drawn to sleek lines and minimalist aesthetics, exploring styles like those found in Modern Interior Design can be particularly beneficial. These renderings then provide a crucial step in refining the final design, ensuring the project aligns perfectly with the client’s vision.
JPEG is a widely used format for photographs due to its good compression ratio, but it can lead to some loss of detail. PNG is preferred for images with sharp lines and text, as it supports lossless compression, preserving image quality. TIFF is a high-quality format often used for professional printing, but its file size is significantly larger.
Illustrative Examples of 3D Interior Design Renderings
Three distinct 3D interior design renderings showcase the versatility and power of this technology in visualizing spaces. Each example highlights different stylistic choices, material selections, and lighting techniques to create unique moods and atmospheres. Analyzing these examples reveals the diverse applications and creative potential of 3D rendering in interior design.
3D interior design rendering offers a powerful way to visualize spaces before construction, allowing clients to experience the final product virtually. This is especially beneficial when designing sophisticated spaces like those found in hotels, such as the impressive Hotel Conference Facilities often require detailed planning. High-quality renderings are crucial for showcasing these facilities, ensuring potential clients understand the space’s functionality and aesthetics before booking.
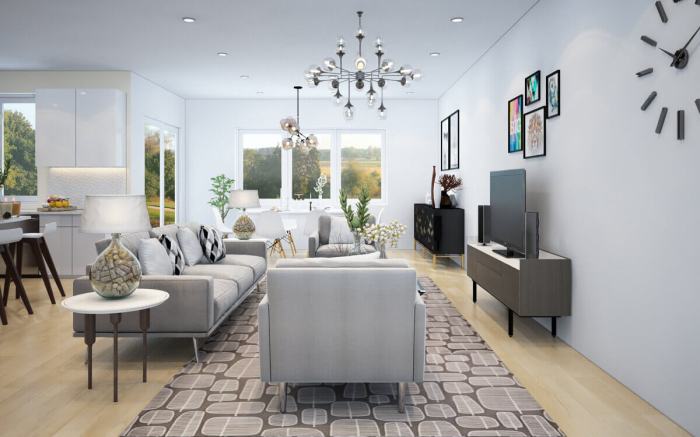
Modern Minimalist Apartment
This rendering depicts a spacious, open-plan apartment characterized by clean lines, neutral colors, and a minimalist aesthetic. The walls are painted a soft, warm gray, providing a neutral backdrop for the carefully selected furniture. The flooring is light-colored oak, adding warmth and texture. A large, strategically placed window allows ample natural light to flood the space, illuminating the sleek, white kitchen cabinets and minimalist furniture.
Artificial lighting is subtly integrated, with recessed spotlights in the ceiling providing task lighting in the kitchen and living area. A single, elegant pendant light hangs above the dining table, adding a touch of sophistication. The overall mood is calm, serene, and sophisticated, reflecting the clean lines and uncluttered space. The use of natural light is crucial in enhancing the feeling of openness and spaciousness.
The color palette, predominantly consisting of grays, whites, and light wood tones, further contributes to the minimalist aesthetic and tranquil atmosphere.
Rustic Farmhouse Kitchen
In stark contrast to the minimalist apartment, this rendering presents a rustic farmhouse kitchen brimming with warmth and character. The dominant feature is a large, distressed wooden island, the centerpiece of the room. The cabinets are painted a creamy white, complemented by dark wood countertops and open shelving displaying rustic crockery and utensils. The walls are clad in whitewashed brick, adding texture and visual interest.
The lighting is a blend of natural and artificial sources. A large window above the sink allows abundant natural light to enter, while warm-toned pendant lights hang above the island, creating a cozy ambiance. The overall mood is inviting, homely, and rustic, conveying a sense of comfort and tradition. The use of natural materials, such as wood and brick, and the warm color palette, create a welcoming and nostalgic atmosphere.
The contrast between the dark wood and the creamy white paints creates visual depth and texture.
Eclectic Victorian Living Room
This rendering showcases a richly detailed Victorian living room, characterized by its eclectic mix of patterns, textures, and colors. The walls are adorned with ornate wallpaper featuring a bold floral pattern, creating a visually stimulating backdrop. The furniture is a mix of antique and modern pieces, with plush velvet sofas and armchairs in deep jewel tones, creating a sense of luxury and comfort.
The flooring is a richly colored patterned carpet that complements the wallpaper. The lighting is layered, incorporating a grand chandelier as the focal point, complemented by table lamps and strategically placed sconces, creating a warm and inviting atmosphere. The overall mood is opulent, dramatic, and inviting. The combination of bold patterns, rich colors, and luxurious textures creates a sense of grandeur and sophistication.
The contrast between the ornate wallpaper and the plush furniture creates a visually captivating space. The lighting scheme plays a crucial role in highlighting the details and textures of the room, creating a sense of drama and elegance.
Ending Remarks
Ultimately, mastering 3D interior design rendering involves a blend of technical proficiency and artistic vision. From the initial concept to the final presentation, each stage demands meticulous attention to detail, ensuring accuracy in measurements and the creation of realistic materials and textures. By effectively utilizing advanced techniques such as global illumination and ray tracing, designers can elevate their renderings to a level of photorealism that captivates clients and transforms the design experience.
The ability to present these renderings in a compelling and informative manner, using high-resolution images and well-structured presentations, is crucial for successful communication and project realization. The result? A seamless transition from digital vision to tangible reality, built on a foundation of creativity, technology, and precise execution.
Q&A: 3D Interior Design Rendering
What is the average cost of a 3D interior rendering?
Costs vary widely depending on complexity, detail, and the renderer’s experience. Expect to pay anywhere from a few hundred to several thousand dollars.
How long does it take to create a 3D rendering?
Rendering time depends on complexity and desired quality. Simple projects may take a few days, while complex ones can take several weeks.
What file formats are commonly used for 3D renderings?
Common formats include JPG, PNG, TIFF, and sometimes higher-resolution formats like EXR for post-processing.
Can I use my own furniture models in a 3D rendering?
Yes, many rendering software allows importing custom 3D models, providing flexibility in design choices.