DIY Easter Home Decor Creative Spring Projects
DIY Easter home decor offers a delightful blend of creativity and cost-effectiveness. Transforming your home into a vibrant Easter haven becomes an enjoyable process, allowing for personalized touches that reflect your unique style. This guide explores various techniques, from egg decorating to crafting wreaths and centerpieces, empowering you to create stunning Easter decorations without breaking the bank. Whether you’re a seasoned crafter or a complete beginner, you’ll find inspiration and easy-to-follow instructions to bring a touch of spring magic into your home.
We’ll delve into diverse methods for egg decorating, including dyeing, painting, and decoupage, comparing their advantages and disadvantages. Learn to create charming Easter wreaths and garlands using readily available materials, explore various centerpiece ideas ranging from rustic to modern, and discover innovative ways to upcycle household items into unique Easter ornaments. Detailed instructions and illustrative examples will guide you through each project, ensuring a successful and enjoyable crafting experience.
Introduction to DIY Easter Home Decor
Spring is in the air, and with it comes the delightful anticipation of Easter! This year, why not infuse your home with the spirit of the season by crafting your own unique Easter decorations? Forget mass-produced, impersonal decorations; embrace the joy of creating personalized, charming pieces that reflect your style and add a touch of handmade warmth to your celebrations.
This guide will inspire you to embark on your own DIY Easter decorating adventure, showcasing projects that are both visually appealing and surprisingly easy to accomplish.Creating your own Easter décor offers a wealth of benefits beyond the beautiful results. It’s a fantastically cost-effective alternative to store-bought decorations, often allowing you to achieve a similar—if not better—aesthetic for a fraction of the price.
Furthermore, DIY allows for unparalleled personalization. You can tailor your decorations to perfectly match your home’s existing style and color scheme, or even incorporate cherished family heirlooms and personal touches to create truly meaningful pieces. Most importantly, the process itself is a rewarding act of creative expression, offering a relaxing and enjoyable way to connect with the spirit of the season.
Simple and Elegant DIY Easter Decor Projects
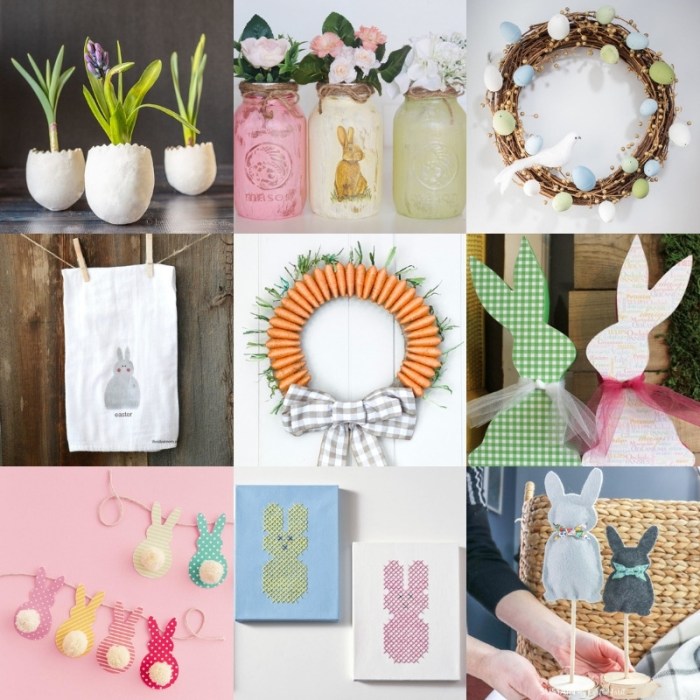
Several straightforward projects can transform your home for Easter. Consider creating a charming centerpiece using pastel-colored eggs, perhaps dyed using natural ingredients like onion skins for a rustic look, arranged in a decorative bowl or basket. Alternatively, crafting simple bunny-shaped garlands from felt or paper is a fun and engaging activity, perfect for involving children. Another beautiful option involves creating miniature Easter nests using twigs and moss, filled with colorful candies or small decorative eggs.
These projects require minimal materials and skill, making them ideal for beginners. The visual impact, however, is significant, adding a touch of springtime elegance to any room.
Cost-Effectiveness and Personalization of DIY Easter Decor
The financial advantages of DIY Easter decorating are undeniable. A single store-bought centerpiece can easily cost upwards of $20, whereas the materials for a comparable DIY project might cost only a few dollars. This cost-saving allows you to create a more extensive and impressive display without breaking the bank. Furthermore, the ability to personalize your decorations is a significant advantage.
Imagine crafting a garland using fabrics that match your sofa cushions or creating egg designs inspired by your children’s artwork. These personalized touches elevate your decorations beyond mere embellishments, transforming them into cherished keepsakes that reflect your unique style and family memories.
Egg Decorating Techniques
Easter egg decorating offers a delightful array of creative possibilities, transforming simple eggs into vibrant works of art. From traditional dyeing methods to more intricate techniques, there’s a perfect approach for every skill level and aesthetic preference. This section explores several popular egg decorating methods, highlighting their unique characteristics and providing a practical guide for your Easter crafting.
Various techniques exist for decorating Easter eggs, each offering a unique visual effect and requiring different levels of skill and materials. Choosing the right method depends on factors such as time availability, budget, and desired outcome. The following explores dyeing, painting, decoupage, and natural material embellishment.
Dyeing Eggs
Dyeing eggs is a classic and straightforward method, perfect for beginners and large-scale projects. The process involves submerging hard-boiled eggs in colored dye baths, resulting in a consistent, even color. Different dye colors can be combined to create unique shades and patterns. A variety of commercially available dye kits simplifies the process. Achieving vibrant, long-lasting color is dependent on the quality of the dye and the length of immersion.
Painting Eggs
Painting offers greater creative control, allowing for intricate designs and personalized touches. Acrylic paints are a popular choice due to their vibrant colors, quick drying time, and ease of application. Fine-tipped brushes enable detailed work, while sponges can create textured effects. Adding glitter, sequins, or other embellishments further enhances the visual appeal. This method requires a slightly steadier hand compared to dyeing, but the artistic possibilities are virtually limitless.
Decoupage Eggs
Decoupage involves adhering decorative paper or fabric scraps to the egg surface, creating unique and personalized designs. Mod Podge or a similar decoupage medium is used to secure the paper and protect the design. This technique allows for the incorporation of various materials, from patterned napkins to magazine clippings. It’s a fun and engaging method, ideal for incorporating themed decorations or personal photographs.
Careful application is crucial to prevent wrinkles or tears in the paper.
Embellishing with Natural Materials
This method utilizes natural elements like leaves, flowers, and ribbons to create a rustic and elegant look. The natural materials are carefully adhered to the egg surface using glue or adhesive tape. This technique offers a unique aesthetic and is particularly well-suited for those seeking a more eco-friendly approach to egg decorating. The use of natural materials lends itself well to minimalist or nature-inspired designs.
Egg Decorating Techniques Comparison Table
| Technique | Materials | Description | Image Description |
|---|---|---|---|
| Dyeing | Hard-boiled eggs, dye tablets or liquid dye, vinegar, containers | Submerging eggs in colored dye baths for a consistent, even color. | A photograph showcasing several eggs dyed in various shades of pastel colors, showing an even color distribution across each egg. |
| Painting | Hard-boiled eggs, acrylic paints, brushes, optional embellishments (glitter, sequins) | Using paints to create intricate designs and personalized touches. | An image depicting eggs with various painted designs, including floral patterns, geometric shapes, and abstract art, demonstrating the versatility of painting. |
| Decoupage | Hard-boiled eggs, decorative paper or fabric scraps, decoupage medium (Mod Podge), brush | Adhering decorative paper or fabric to the egg surface. | A close-up photograph of an egg decorated with a decoupaged floral pattern, showcasing the texture and detail of the applied paper. |
| Natural Materials | Hard-boiled eggs, natural materials (leaves, flowers, ribbons), glue or adhesive tape | Using natural elements to create a rustic and elegant look. | An image showing eggs adorned with carefully placed leaves and small flowers, creating a nature-inspired design with a rustic feel. |
Creating Easter Wreaths and Garlands
Crafting Easter wreaths and garlands is a delightful way to infuse your home with springtime cheer. These decorative elements offer versatility, allowing for both simple, rustic designs and more elaborate, personalized creations. The process is often surprisingly straightforward, requiring readily available materials and minimal crafting skills.Creating Easter wreaths and garlands provides a wonderful opportunity for personalization. You can adapt the designs to match your existing home decor, choosing color palettes and materials that complement your style.
Whether you prefer a natural, rustic look or a vibrant, modern aesthetic, there are countless possibilities to explore.
Simple Twig Wreath with Spring Flowers
To create a simple Easter wreath, begin by gathering a bundle of twigs or branches. Ideally, these should be relatively pliable yet sturdy enough to hold their shape. Willow branches are a popular choice for their flexibility and attractive appearance. Once you have a sufficient quantity of twigs, carefully bend them into a circular shape, overlapping the ends to form a wreath base.
Secure the intersections using floral wire or twine, ensuring the structure is firm and stable. Next, gather a selection of spring flowers such as daffodils, tulips, or hyacinths. These can be fresh or artificial, depending on your preference and the longevity you desire. Arrange the flowers around the twig base, securing them with floral wire or hot glue.
Finally, add a ribbon or twine for hanging. A pastel-colored ribbon would complement the spring flowers beautifully, creating a visually appealing and festive wreath.
Paper Flower Garland Creation
Constructing a paper flower garland involves cutting out numerous flower shapes from colored paper. A simple template can be created by tracing a flower shape onto cardstock or using a pre-made template found online. Cut out multiple flowers in various sizes and colors, creating depth and visual interest. Once you have a collection of paper flowers, fold each flower in half, creating a slight crease along the center.
Then, using a glue stick or hot glue, attach the flowers to a length of string or ribbon, alternating sizes and colors for a pleasing aesthetic effect. You can space the flowers evenly or cluster them together for a more lush appearance. This garland can be hung indoors or outdoors, adding a touch of whimsy to any space.
Consider using waterproof glue for outdoor applications to ensure the garland withstands the elements.
Alternative Materials for Wreath and Garland Creation
Choosing the right materials is key to creating a unique and personalized Easter wreath or garland. The possibilities are extensive, allowing for creativity and resourcefulness.
- Natural Materials: Twigs, vines, pine cones, dried flowers, leaves, moss, berries (artificial or natural if using outdoors). Consider foraging for natural materials, ensuring you are respecting local flora and fauna.
- Recycled Materials: Cardboard, egg cartons, plastic bottles (carefully cleaned and cut), fabric scraps, newspaper (for paper mache), old greeting cards.
- Purchased Materials: Floral foam, artificial flowers and greenery, ribbons, wire, decorative embellishments, pre-made wreath forms.
DIY Easter Centerpieces
Creating stunning Easter centerpieces is a fantastic way to elevate your home’s festive atmosphere. Whether you prefer a rustic charm, modern minimalism, or classic elegance, there’s a perfect centerpiece waiting to be crafted. The following examples demonstrate how diverse materials and styles can contribute to a unique and memorable Easter display.
Crafting DIY Easter home decor offers a fun and personal touch to your spring celebrations. Consider incorporating sustainable materials in your creations, for instance, by repurposing old jars or using natural dyes; check out this guide on Sustainable home decor for more inspiration. This approach allows you to enjoy beautiful, eco-friendly Easter decorations while minimizing your environmental impact.
Ultimately, DIY allows for creative and sustainable Easter home decor.
Rustic Easter Centerpiece
This centerpiece embraces natural textures and earthy tones, evoking a sense of springtime warmth and simplicity.
Materials Needed:
- A wooden crate or basket
- Moss or burlap
- Pastel-colored eggs (real or faux)
- Small potted succulents or spring flowers (tulips, daffodils)
- Twigs or small branches
- Ribbon or twine
Step-by-Step Instructions:
- Line the crate or basket with moss or burlap for a rustic base.
- Arrange the potted plants within the container, creating a visually pleasing grouping.
- Nestle the pastel eggs amongst the plants and greenery.
- Add twigs or branches for height and texture, weaving them subtly amongst the arrangement.
- Tie a ribbon or twine around the handle of the basket (if applicable) or around a cluster of branches for added visual interest.
Modern Easter Centerpiece
This centerpiece features clean lines, a monochromatic palette, and a focus on sleek, contemporary elements.
Crafting DIY Easter home decor can be a fun and rewarding experience, allowing for personalized touches throughout your home. For inspiration on creating a stunning focal point, you might find the advice in this article on Holiday mantel decorating tips particularly helpful, especially when considering how to arrange your Easter decorations. Applying these broader mantel decorating principles can elevate your DIY Easter projects, resulting in a truly festive and memorable display.
Materials Needed:
- A low, clear glass bowl or vase
- White or pastel-colored eggs (real or faux)
- Simple, minimalist spring flowers (white tulips, anemones)
- Small, white stones or pebbles
- Optional: A single, geometric candle
Step-by-Step Instructions:
- Fill the glass bowl with white stones or pebbles to create a stable base.
- Arrange the eggs on top of the stones, creating a visually balanced grouping.
- Add the minimalist spring flowers, keeping the arrangement simple and uncluttered.
- If desired, place a single, geometric candle in the center of the arrangement for a touch of elegance.
Traditional Easter Centerpiece, DIY Easter home decor
This centerpiece incorporates classic Easter symbols and colors, creating a cheerful and familiar display.
Materials Needed:
- A decorative bowl or platter
- Brightly colored eggs (real or faux)
- A variety of spring flowers (daffodils, hyacinths, lilies)
- Easter grass
- Small Easter bunnies or chicks (optional)
Step-by-Step Instructions:
- Line the bowl or platter with Easter grass.
- Arrange the brightly colored eggs amongst the grass.
- Add the spring flowers, creating a lush and vibrant bouquet.
- If desired, incorporate small Easter bunnies or chicks for a playful touch.
Natural Spring Centerpiece
This centerpiece showcases the beauty of readily available natural elements found in spring, creating a charming and organic arrangement.
Materials and Arrangement:
Imagine a shallow woven basket lined with soft, fresh moss. Delicate sprigs of pussy willow, their silvery buds unfurling, are arranged in the center, their graceful branches reaching upwards. Around the pussy willow, we place several smooth, grey river stones, their cool texture contrasting with the soft moss. Scattered amongst the stones are a few vibrant wildflowers, perhaps cheerful yellow buttercups and delicate blue forget-me-nots, their colors echoing the bright sky of a spring day.
Finally, several newly hatched robin’s eggs (carefully collected after the birds have fledged) are nestled amongst the moss and wildflowers, adding a touch of nature’s artistry to the composition. The overall aesthetic is one of gentle simplicity, showcasing the raw beauty of nature’s springtime bounty. The arrangement evokes a sense of quiet tranquility, celebrating the renewal and growth of the season.
Crafting Easter-Themed Bunting and Banners

Source: walmartimages.com
Adding festive bunting and banners is a delightful way to enhance your Easter home décor. These simple yet impactful decorations can be customized to perfectly match your existing theme, adding a touch of whimsy and celebration to any space. They are also a wonderful project for crafting with children.
Easter bunting and banners offer a wide array of design possibilities. From classic pastel hues and floral motifs to playful bunny rabbits and vibrant egg patterns, the creative options are virtually limitless. The choice of material also significantly impacts the final look and feel, influencing the overall aesthetic of your Easter decorations.
Simple Fabric Bunting
Creating fabric bunting is a straightforward process, ideal for those with basic sewing skills. Begin by selecting a variety of coordinating fabric scraps in Easter-themed colors and patterns. Cut the fabric into triangles or rectangles of a consistent size, remembering to add seam allowances. Once cut, sew the pieces together along the edges, leaving a space at the top for threading ribbon or twine.
Finally, thread the ribbon or twine through the top opening, and hang your completed bunting. A simple running stitch is sufficient for this project. Consider using fabrics with pre-existing Easter patterns or embroidering simple designs onto plain fabric for a personalized touch.
No-Sew Banner Alternatives
For those who prefer a no-sew approach, several alternative methods exist for creating eye-catching Easter banners. Using felt, for instance, allows for easy cutting and shaping of various Easter-themed designs. Simply cut out shapes like eggs, bunnies, or flowers from different colored felt sheets, and then glue them onto a length of ribbon or sturdy string. This method requires minimal tools and provides a soft, tactile element to your décor.
Alternatively, colorful cardstock or construction paper can be employed, offering a vibrant and inexpensive option. Similar to the felt method, cut out desired shapes and adhere them to a backing of ribbon or string using glue or double-sided tape. This method is particularly well-suited for children’s crafting activities. Finally, using pre-made ribbon in various Easter colors and patterns offers a quick and elegant approach.
Simply knot or glue pre-cut lengths of ribbon onto a string, creating a visually appealing and effortlessly festive banner.
Upcycled Easter Decor
Giving new life to old items is a fantastic way to create unique Easter decorations while minimizing environmental impact. Upcycling transforms discarded materials into beautiful and functional ornaments, adding a touch of sustainable charm to your Easter celebrations. This approach not only reduces waste but also allows for creative expression, resulting in one-of-a-kind decorations that reflect your personal style.Upcycling common household items for Easter decorations offers a plethora of possibilities.
Many materials readily available in the home can be easily transformed into festive ornaments.
Repurposing Materials for Easter Decorations
Numerous everyday items can be repurposed for Easter. Empty egg cartons, for instance, can be cut and shaped into adorable little chicks or bunnies. Cardboard tubes from toilet paper or paper towels can be painted and decorated to become charming Easter bunnies or flower stems. Glass jars, often discarded after use, can be painted, embellished with ribbons, and filled with spring flowers to create delightful centerpieces.
Similarly, old fabric scraps can be stitched together to form colorful Easter bunnies or chicks, while plastic Easter eggs can be refilled with small treats or used as containers for miniature plants. Even old newspapers can be rolled and glued to create unique Easter baskets.
Transforming Recycled Materials into Easter Ornaments
The transformation process is often simple and requires minimal tools. For example, egg cartons can be cut into individual cups, painted in pastel colors, and adorned with googly eyes and felt beaks to create adorable chicks. Cardboard tubes can be cut to size, painted, and decorated with construction paper ears and a cotton tail to become charming bunnies. Glass jars can be cleaned and decorated with paint, ribbons, and lace to create elegant vases for spring flowers.
Old fabric scraps can be sewn into simple shapes, stuffed with cotton, and embellished with buttons and embroidery to create soft Easter toys. Plastic Easter eggs can be filled with small candies or chocolates, or even used to hold miniature succulents or other small plants.
Environmental Benefits of Upcycling for Easter
Upcycling significantly reduces waste sent to landfills, contributing to a more sustainable lifestyle. By repurposing existing materials, we decrease the demand for new resources and the energy associated with their production and transportation. This practice aligns with the principles of reducing, reusing, and recycling, promoting environmental responsibility and conservation. The creation of unique, handcrafted decorations reduces reliance on mass-produced, often less sustainable, alternatives.
Furthermore, the act of upcycling encourages creativity and resourcefulness, fostering a deeper appreciation for the environment and a more mindful approach to consumption. This practice contributes to a smaller carbon footprint and helps preserve natural resources.
Creating DIY Easter home decor is a fun and rewarding project, allowing for personalized touches that reflect your style. The same creative spirit can be applied to other seasonal projects, and transitioning that energy to your outdoor space is a natural progression. For inspiration on extending that creative flair to your backyard, check out this guide on Summer outdoor living decor.
Then, you can bring those summery ideas back indoors, perhaps incorporating similar color palettes or DIY techniques into your autumnal or winter home decor projects.
Easter Bunny & Other Figurines
Crafting adorable Easter bunnies and other figurines adds a charming, handmade touch to your Easter decorations. These delightful additions can be created using a variety of readily available materials, offering a fantastic opportunity for creative expression and personalized décor. The techniques are generally straightforward, making them suitable for crafters of all skill levels.
Felt Easter Bunny
This charming bunny is crafted from soft, colorful felt. Begin by cutting out two identical bunny shapes from felt, ensuring to include the head, ears, and body. Next, cut out smaller shapes for the bunny’s face – eyes, nose, and mouth – from contrasting felt colors. Using fabric glue or a sewing machine, stitch the two bunny shapes together, leaving a small opening to stuff the bunny with cotton or fiberfill.
Once stuffed, close the opening neatly. Finally, glue the facial features onto the bunny’s face. A simple, yet effective, bow can be added to complete the look. Consider adding small details like whiskers using embroidery floss.
Creating DIY Easter home decor is a fun and rewarding way to personalize your space for the spring season. A key element of many Easter decorations involves incorporating fresh blooms, and for inspiration on beautiful arrangements, check out this guide on Spring floral arrangements for homes. These floral ideas can easily be adapted into your DIY Easter projects, adding a touch of springtime elegance to your festive decorations.
Fabric Scrap Bunny
This whimsical bunny utilizes fabric scraps for a patchwork effect. Gather various colorful fabric scraps in a variety of patterns and textures. Cut out several small squares and rectangles of varying sizes. Sew these pieces together to create a unique patchwork design for the bunny’s body. The head and ears can be made from a single piece of fabric or from additional patchwork.
Stuff the bunny as described in the felt bunny method. Embellish with buttons, ribbons, or other decorative elements for a personalized touch. The uneven nature of the fabric scraps adds to the rustic charm.
Paper Mache Easter Bunny
This sturdy bunny is created using the paper mache technique. Start by creating a base form using crumpled newspaper or fabric scraps. Cover this form with layers of papier-mâché paste (made from flour and water or a commercial paste) and strips of newspaper. Allow each layer to dry completely before adding the next. Once dry and hardened, carefully shape and smooth the form.
Add details such as ears, tail, and facial features using additional layers of papier-mâché. Once completely dry, paint the bunny in your desired colors and add details with paint or markers. This method allows for intricate designs and larger figurines.
Creating DIY Easter home decor is a fun and affordable way to refresh your living space for the spring season. Adding touches like hand-painted eggs or bunny-themed crafts can instantly brighten a room, and to really elevate the coziness, consider incorporating elements from Cozy living room essentials – think soft throws and cushions in pastel shades. These additions will complement your Easter decorations, resulting in a beautifully coordinated and welcoming atmosphere.
Other Easter Figurines
Creating other Easter-themed figurines is equally rewarding. Chicks can be made using felt, yarn, or even painted eggshells. Simple felt shapes, stitched together and stuffed, make adorable chicks. Yarn chicks can be crafted by wrapping yarn around a balloon, adding details once dry. Painted eggshells, embellished with tiny felt or paper details, make miniature chick figurines.
Lambs can be created using similar techniques, using white felt or yarn to create the fluffy wool. Consider using cotton balls for added texture. Simple egg-shaped figurines can be made from clay, painted, and decorated with various elements, such as glitter or small beads.
Last Recap
Source: diycandy.com
Creating your own DIY Easter home decor provides an enriching experience, blending artistic expression with the joy of personalized home decoration. From the vibrant colors of decorated eggs to the charming details of handmade wreaths and centerpieces, each project adds a unique touch to your Easter celebrations. This guide has provided a comprehensive exploration of various techniques and materials, empowering you to unleash your creativity and transform your home into a beautiful Easter sanctuary.
Embrace the joy of crafting and enjoy the rewarding process of bringing your unique Easter vision to life.
Top FAQs
What are some eco-friendly options for Easter decorations?
Use natural materials like twigs, leaves, and flowers; repurpose items like egg cartons and jars; and choose biodegradable dyes for egg decorating.
How can I involve children in DIY Easter decorating?
Simple projects like egg dyeing, paper flower garland making, and decorating with stickers are perfect for kids. Supervise younger children closely when using sharp objects or hot materials.
Where can I find inexpensive materials for DIY Easter crafts?
Thrift stores, craft supply discounters, and even your own recycling bin are excellent sources of affordable materials. Nature also provides many free options, like twigs and leaves.
How long do DIY Easter decorations typically last?
It varies depending on the materials used. Some items, like painted eggs, might only last a few weeks, while others, like fabric banners, can be stored and reused for years.
What if I don’t have any crafting experience?
Don’t worry! Many of these projects are beginner-friendly. Start with simpler techniques and gradually try more advanced ones as you gain confidence.


